

Photo by RetroSupply on Unsplash
OAuth2 and OpenID Connect with WSO2 IS - Part 11
JWT Bearer Grant Type


🧬 Introduction
OAuth2.0 JWT Bearer Grant type is a grant type that enables the exchange of one JWT token for another. When a request is made to the /oauth2/token endpoint, with the JWT Bearer Grant type, the JWT assertion, the Client ID, and the Client Secret, the WSO2 IS will read the grant type and trigger the JWT Bearer Grant handler. This handler will then check for the issuer of the JWT token and get the Identity Provider(IdP) configurations. After that, it will check the public certificate of the IdP and validate the JWT. After the validation of the JWT, it will provide an OAuth2.0 Access Token for the application with the Client ID, and the Client Secret.
To clearly understand the flow, check the below diagram.

First, the user sends a login request to the client application.
The client application sends an authorization request to the third-party IdP, which is the JWT token issuer.
The third-party IdP returns the JWT access token for the user to the client application.
The client application makes a token exchange request to the authorization server, by providing the necessary parameters.
The authorization server validates the request, performs the token exchange, generates a new access token of the requested type based on the provided parameters and the server's policy, and responds to the client with the new access token.
The client application can now request resources from the resource server by providing the access token.
As the resource server trusts WSO2 IS-issued tokens, it returns the requested resources to the client application.
The WSO2 Identity Server has two mechanisms to get the public certificate of the connected IdP to validate the signature in JWT assertion.
Using the public certificate uploaded via the WSO2 management console.
Using the JWKS endpoint of the IdP.
We will check how you can use both of the above methods to configure the JWT Bearer Grant Type with WSO2 IS.
🧪 Testing JWT Bearer Grant Type with WSO2 IS
📌 Using the Public Certificate Uploaded via the WSO2 Management Console
We will be using two WSO2 IS packages to check the JWT Bearer Grant type, since we need an external Identity Provider to configure as a JWT issuer. We will call them IS-1 and IS-2.
First, go to <IS2_HOME>/repository/resources/security and open a new terminal there. Then, type the following command in the terminal to obtain the public certificate of IS-2.
keytool -export -keystore wso2carbon.jks -alias wso2carbon -storepass wso2carbon -file idp.pem
The above command will create a new file named idp.pem inside the <IS2_HOME>/repository/resources/security directory.
Now, run IS-1 and go to https://localhost:9443/carbon to view the WSO2 Management Console.
Go to the Identity Providers → Add to add a new Identity Provider. Give jwtIDP for the Identity Provider name and select Upload IDP Certificate for the Choose IDP Certificate type. Upload the idp.pem file of IS-2 as the Identity Provider Public Certificate and click on Update.

Next, go to Service Providers → Add to create a new Service Provider(SP) in IS-1. Give playground_2 as its name. Then go to the Inbound Authentication Configuration → OAuth/OpenID Connect Configuration and click on the Configure button. Select all the Allowed Grant Types and provide http://localhost:8080/palyground2/oauth2client as the Callback Url.

Make sure to copy and paste the Client ID and Client Secret for future reference. In my case they are,
Client ID
↳
CuW_JHEH82XFfstmjD1guP9wWYAaClient Secret
↳
YcYQre1MEwQWRocP2L20GbBLwTYa
Next, we need to configure the IS-2. First, go to <IS2_HOME>/repository/conf directory and open deployment.toml file. Add the following configuration there. The [server] configuration is already there in the deployment.toml Therefore, first, find that and add the offset=1 as the last line of that configuration.
[server]
offset = 1
Then, run IS-2 and go to Identity Providers → Resident and go to Inbound Authentication Configuration → OAuth/OpenID Connect Configuration and give jwtIDP as the Identity Provider Entity ID value. This is the IdP name we gave when we created the IdP in IS-1.

Next, go to Service Providers → Add to create a new Service Provider(SP) in IS-2. Give playground_3 as its name. Then go to the Inbound Authentication Configuration → OAuth/OpenID Connect Configuration and click on the Configure button. Select all the Allowed Grant Types and provide http://localhost:8080/palyground3/oauth2client as the Callback Url. Also, find the Enable Audience Restriction, enable it and give https://localhost:9443/oauth2/token as the Audience value.

Make sure to copy and paste the Client ID and Client Secret for future reference. In my case they are,
Client ID
↳
WwORs0kbHEm5AGUSf3QKSY6HITUaClient Secret
↳
0Q59sGgP5DUTbnN8VcZAagh1qTUa
We don't necessarily need to run playground2 and playground3 apps in apache-tomcat to get Access Tokens using the JWT Bearer Grant Type. Because we can get the initial Access Token with Implicit Grant type and get the JWT Bearer Grant type Access Token with a cURL request.
Use Implicit Grant to get a JWT Token using playground_3 app and IS-2. This is the JWT Token we will use to share with IS-1.
URL format
↳
https://localhost:9444/oauth2/authorize?response_type=id_token token&client_id=<CLIENT_ID>&nonce=oidc&redirect_uri=<REDIRECT_URI>&scope=openidSample URL
↳
https://localhost:9444/oauth2/authorize?response_type=id_token token&client_id=WwORs0kbHEm5AGUSf3QKSY6HITUa&nonce=oidc&redirect_uri=http://localhost:8080/playground3/oauth2client&scope=openid
After entering the above URL, you will be prompted to type your username and password to authentication. After the authentication, you will get an Access Token with an ID Token(ID Token is a JWT) in the URL(Check my article on Implicit Grant type to learn about this more). Copy the ID Token and paste it on https://jwt.io/
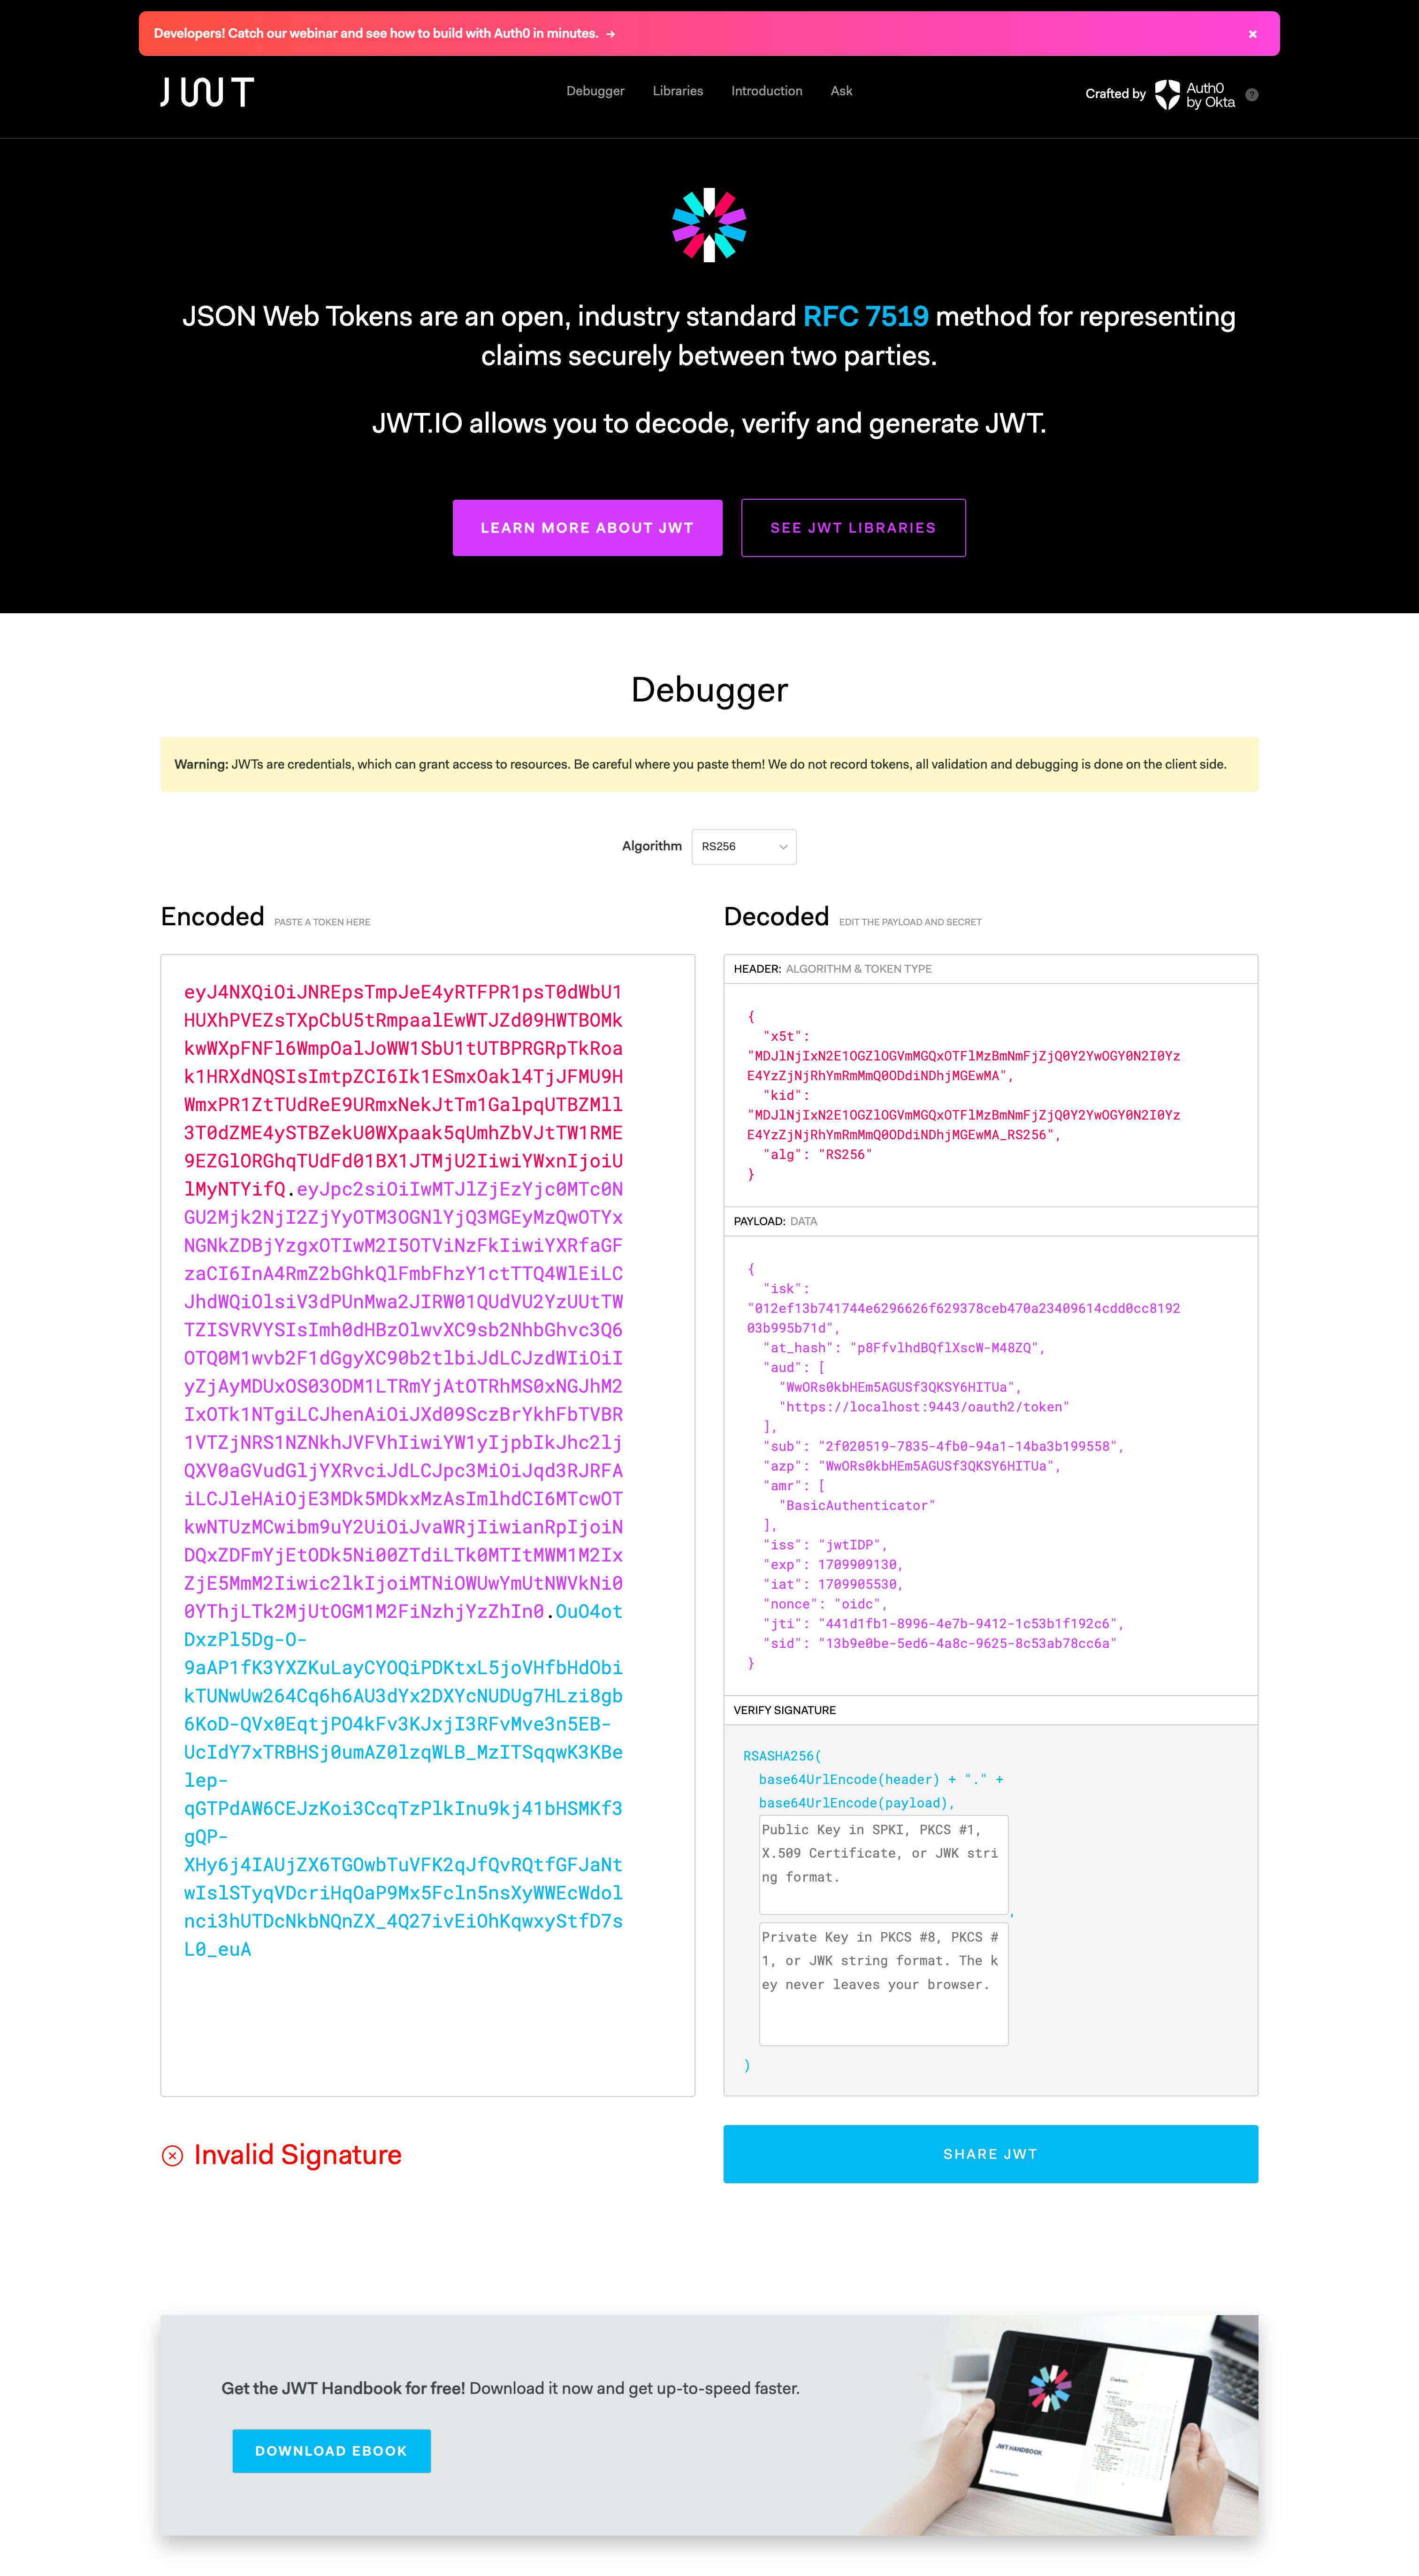
Note the iss value in the decoded JWT token. You can see that it is the name of the IdP you have created in IS-1. You are getting this value because you have changed the Resident IdP's Inbound Authentication Configurations in IS-2. Otherwise, you will get, https://localhost:9444/oauth2/token there. If you don't want to change the Resident IdP Configurations in IS-2, then you have to provide https://localost:9444/oauth2/token value as an Identity Provider's Issuer Name in the IdP we created in IS-1. To do that, go to Identity Providers → List → jwtIDP in IS-1, and add https://localost:9444/oauth2/token as the Identity Provider's Issuer Name of jwtIDP*. Since we have configured the Resident* IdP's configurations in IS-2, we will not be using this.

Since we got an ID Token using the playground_3 app, the playground_2 app in IS-1, can exchange it for an Access Token using JWT Bearer Grant type. To get that, execute the following cURL command.
cURL format
↳
curl -k -v --user <CLIENT_ID>:<CLIENT_SECRET> -d "grant_type=urn:ietf:params:oauth:grant-type:jwt-bearer&scope=openid&assertion=<JWT_ID_TOKEN>" https://localhost:9443/oauth2/tokenSample cURL
↳
curl -k -v --user CuW_JHEH82XFfstmjD1guP9wWYAa:YcYQre1MEwQWRocP2L20GbBLwTYa -d "grant_type=urn:ietf:params:oauth:grant-type:jwt-bearer&scope=openid&assertion=eyJ4NXQiOiJNREpsTmpJeE4yRTFPR1psT0dWbU1HUXhPVEZsTXpCbU5tRmpaalEwWTJZd09HWTBOMkkwWXpFNFl6WmpOalJoWW1SbU1tUTBPRGRpTkRoak1HRXdNQSIsImtpZCI6Ik1ESmxOakl4TjJFMU9HWmxPR1ZtTUdReE9URmxNekJtTm1GalpqUTBZMll3T0dZME4ySTBZekU0WXpaak5qUmhZbVJtTW1RME9EZGlORGhqTUdFd01BX1JTMjU2IiwiYWxnIjoiUlMyNTYifQ.eyJpc2siOiIwMTJlZjEzYjc0MTc0NGU2Mjk2NjI2ZjYyOTM3OGNlYjQ3MGEyMzQwOTYxNGNkZDBjYzgxOTIwM2I5OTViNzFkIiwiYXRfaGFzaCI6InA4RmZ2bGhkQlFmbFhzY1ctTTQ4WlEiLCJhdWQiOlsiV3dPUnMwa2JIRW01QUdVU2YzUUtTWTZISVRVYSIsImh0dHBzOlwvXC9sb2NhbGhvc3Q6OTQ0M1wvb2F1dGgyXC90b2tlbiJdLCJzdWIiOiIyZjAyMDUxOS03ODM1LTRmYjAtOTRhMS0xNGJhM2IxOTk1NTgiLCJhenAiOiJXd09SczBrYkhFbTVBR1VTZjNRS1NZNkhJVFVhIiwiYW1yIjpbIkJhc2ljQXV0aGVudGljYXRvciJdLCJpc3MiOiJqd3RJRFAiLCJleHAiOjE3MDk5MDkxMzAsImlhdCI6MTcwOTkwNTUzMCwibm9uY2UiOiJvaWRjIiwianRpIjoiNDQxZDFmYjEtODk5Ni00ZTdiLTk0MTItMWM1M2IxZjE5MmM2Iiwic2lkIjoiMTNiOWUwYmUtNWVkNi00YThjLTk2MjUtOGM1M2FiNzhjYzZhIn0.OuO4otDxzPl5Dg-O-9aAP1fK3YXZKuLayCYOQiPDKtxL5joVHfbHdObikTUNwUw264Cq6h6AU3dYx2DXYcNUDUg7HLzi8gb6KoD-QVx0EqtjPO4kFv3KJxjI3RFvMve3n5EB-UcIdY7xTRBHSj0umAZ0lzqWLB_MzITSqqwK3KBelep-qGTPdAW6CEJzKoi3CcqTzPlkInu9kj41bHSMKf3gQP-XHy6j4IAUjZX6TGOwbTuVFK2qJfQvRQtfGFJaNtwIslSTyqVDcriHqOaP9Mx5Fcln5nsXyWWEcWdolnci3hUTDcNkbNQnZX_4Q27ivEiOhKqwxyStfD7sL0_euA" https://localhost:9443/oauth2/token
Note that we are using playground_2 application's Client ID and Client Secret here. With the execution of that cURL command, you will get an Access Token and an ID Token.

When you paste it in https://jwt.io/ you will notice its iss is https://localhost:9443/oauth2/token and the amr value of it is urn:ietf:params:oauth:grant-type:jwt-bearer.

This is how you can get an Access Token and ID Token using the JWT Bearer Grant type. Let's check how you can use the JWKS endpoint with JWT Bearer Grant type.
📌 Using the JWKS Endpoint
Rather than using the Public Certificate of IS-1 we can use the JWKS endpoint. The JWKS endpoint is a read-only endpoint which will give the public key set of WSO2 IS in JSON Web Key Set format. If you invoke the following cURL command you can get the values of the JWKS endpoint of IS-1.
curl -k --location 'https://localhost:9443/oauth2/jwks' \
--header 'Authorization: Basic YWRtaW46YWRtaW4='

kty (Key Type) Parameter. This attribute identifies the cryptographic algorithm family used with the key, such as “RSA” or “EC”. This attribute is required.
kid (Key ID): This is the thumbprint of the certificate. kid parameter is used to identify a key, with the purpose of choosing among a set of keys within a JWK Set during key rollover. The kid parameter is utilized to look for the appropriate public key, as it is also included in the JWT JOSE(JavaScript Object Signing and Encryption) header.
use (Public Key Use) Parameter. This parameter identifies the intended use of the public key. The “use” parameter is employed to indicate whether a public key is used for encrypting data or verifying the signature on data. This attribute is optional, although encouraged.
The following values are defined by this specification:
1. sig (signature)
2. enc (encryption)
alg: Parameter identifies the algorithm intended for use with the key. eg in RSA, we can have RSA256 or RSA512
In addition to the above common parameters, there are some optional parameters decribed in the JWK specification. Following are some algorithm-specific parameters. When working specifically with RSA public keys, the following attributes can be used to describe such type of key:
n Parameter is used to define the modulus for both the public and private keys. Its length, usually expressed in bits, is the key length.
e Parameter is used to define the RSA public exponent
To use JWKS endpoint we have to configure the settings in jwtIDP in IS-1. To do that, go to Identity Providers → List → jwtIDP and configure the following.
The https://<IS_HOST>:<IS_PORT>/oauth2/jwks is the default JWKS endpoint of WSO2 IS. Since we have to configure the JWKS endpoint of IS-2 for jwtIDP, we can simply select the Choose IDP certificate type as Use IDP JWKS endpoint and give https://localhost:9444/oauth2/jwks as the Identity Provider's JWKS Endpoint.
Now, let's get the ID Token using the playground_3 app in IS-2 first. To do that type the following URL in the browser.
https://localhost:9444/oauth2/authorize?response_type=id_token token&client_id=WwORs0kbHEm5AGUSf3QKSY6HITUa&nonce=oidc&redirect_uri=http://localhost:8080/playground3/oauth2client&scope=openid
After getting the ID token, execute the following cURL command to get the Access Token and the ID Token with the playground_2 app.
curl -k -v --user CuW_JHEH82XFfstmjD1guP9wWYAa:YcYQre1MEwQWRocP2L20GbBLwTYa -d "grant_type=urn:ietf:params:oauth:grant-type:jwt-bearer&scope=openid&assertion=eyJ4NXQiOiJNREpsTmpJeE4yRTFPR1psT0dWbU1HUXhPVEZsTXpCbU5tRmpaalEwWTJZd09HWTBOMkkwWXpFNFl6WmpOalJoWW1SbU1tUTBPRGRpTkRoak1HRXdNQSIsImtpZCI6Ik1ESmxOakl4TjJFMU9HWmxPR1ZtTUdReE9URmxNekJtTm1GalpqUTBZMll3T0dZME4ySTBZekU0WXpaak5qUmhZbVJtTW1RME9EZGlORGhqTUdFd01BX1JTMjU2IiwiYWxnIjoiUlMyNTYifQ.eyJpc2siOiIyYTEwYmY4MTZjMTcwNTU1ZWQ5OWUxYjMxMzU4YTUzMjkwMjc0MzJmZDY4M2E2MmEwNDEyYzNlMGI4Njc4ODc2IiwiYXRfaGFzaCI6InA4RmZ2bGhkQlFmbFhzY1ctTTQ4WlEiLCJhdWQiOlsiV3dPUnMwa2JIRW01QUdVU2YzUUtTWTZISVRVYSIsImh0dHBzOlwvXC9sb2NhbGhvc3Q6OTQ0M1wvb2F1dGgyXC90b2tlbiJdLCJzdWIiOiIyZjAyMDUxOS03ODM1LTRmYjAtOTRhMS0xNGJhM2IxOTk1NTgiLCJhenAiOiJXd09SczBrYkhFbTVBR1VTZjNRS1NZNkhJVFVhIiwiYW1yIjpbIkJhc2ljQXV0aGVudGljYXRvciJdLCJpc3MiOiJqd3RJRFAiLCJleHAiOjE3MDk5MTExOTQsImlhdCI6MTcwOTkwNzU5NCwibm9uY2UiOiJvaWRjIiwianRpIjoiNzgxZGZlMjYtY2VhNC00MzEyLTg5MTEtM2MxMTM5ZDVjYTlkIiwic2lkIjoiNWVjZjI5YjAtNTFmYy00NmNkLWFkNzMtNTUxZWQwYjQ2YzI2In0.Dr1hTRcMJtSByKTT4nyb6ZJB6Tly4qX4zj4zCz327Hdnq1FmO_Zziq6aEtsOdJrj06D0AMNO1u9rZ2VswpjBmEPHBzSRUjAYYhdznR7apv2DoUmS3dwoKewB_4NqRosB4N6aYt-1nGGvc_yPWzUqz50Hc8iNk7nqPuSZBXRdT_J3NEGEVubmScmJ_t_d8xmPUqSfbpIxZ0VLATf3tn7DJ8JJRJuUNw0nhNCkUSY9V3ncNgDO91XmQQCg8hTHqjvdYINA8tHs4goD0NuKIkslL1912y_gosTpOyW8t0dcRI9UIJmScGpw7R7jEEdfLGyfkzNjifcuQwWkkncbSpXVMw" https://localhost:9443/oauth2/token
These commands are the same ones we have looked at previously with the public certificate import scenario. Therefore, you can refer them to understand the formats of them. When you execute the above cURL command you will get an Access Token with an ID Token.

So this is it regarding the JWT Bearer Grant type. We will explore the SAML2 Bearer Grant in the next article.