The eventing framework of the WSO2 Identity Server can be used to trigger events for user operation events like PRE_ADD_USER and POST_ADD_USER. Furthermore, it can also be used to do operations upon a triggered event. For instance, an event handler can be used to validate the username when a new user is created by triggering the PRE_ADD_USER event.
What is an event handler?
An event handler is used to perform an operation based on the published events. For instance, we can print the event properties after a user addition.
When adding a new user, the following sequence of operations is executed.
Publish the PRE_ADD_USER event.
↳ The subscribed handlers will be executed for the pre-add user event.Execute the AddUser operation.
↳ The user will be persisted in the user store (LDAP, AD, or JDBC).Publish the POST_ADD_USER event.
↳ The subscribed handlers will be executed for the post-add user event.
Therefore, we can perform our task via an event handler, which is subscribed to the POST_ADD_USER event.
Writing a custom event handler
When writing a custom event handler for the WSO2 Identity Server, we can create it as an OSGi microservice. You can follow the below-given steps to create a custom event handler.
Step 1: Create a new Maven project and include all the necessary dependencies
Although the WSO2 Identity Server 7.0 has been released as of writing this article, I will be writing the custom event handler to work in WSO2 Identity Server 6.1. If you want to write a custom event handler for the WSO2 Identity Server 7.0, you need to update the dependency versions by cross-checking them with WSO2 Identity Server Dependencies (Make sure to check in to the correct branch and checkout the pom.xml file).
Furthermore, I will be using IntelliJ IDEA as my IDE to implement the custom event handler. But you can use any IDE of your choice as well.
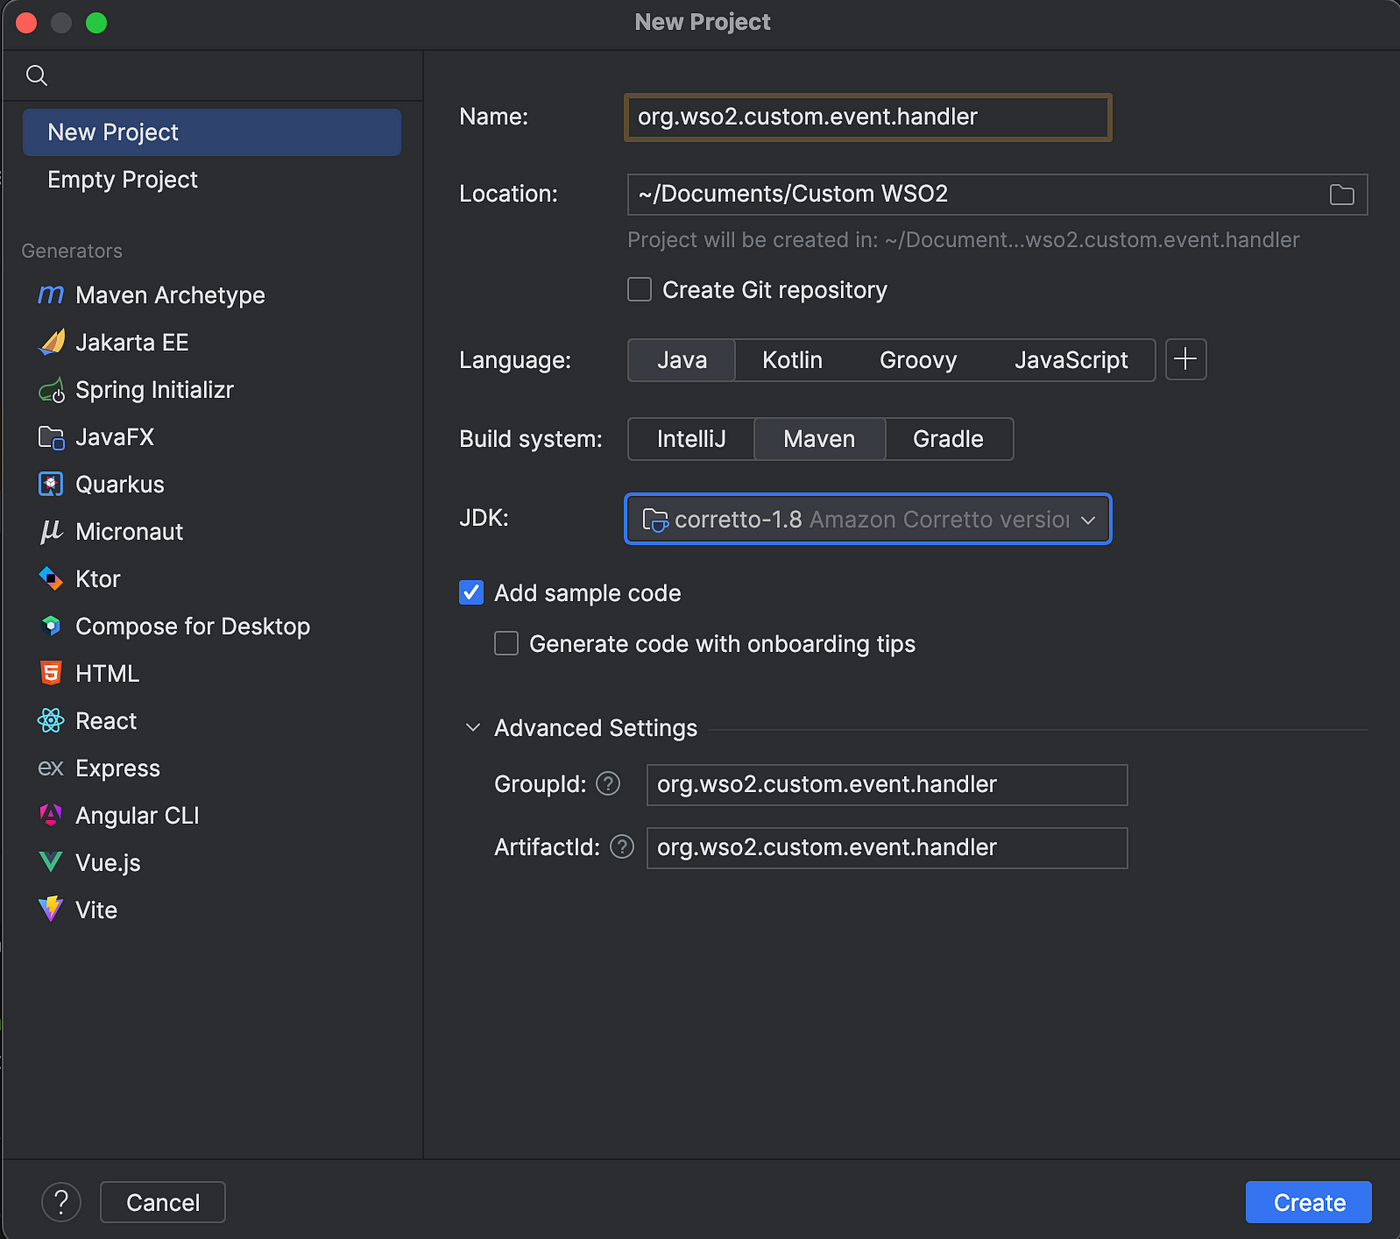
After creating the project you will have a Main.java file in your project. Since we are writing an OSGi service, we do not need that. Therefore, you can delete that file.
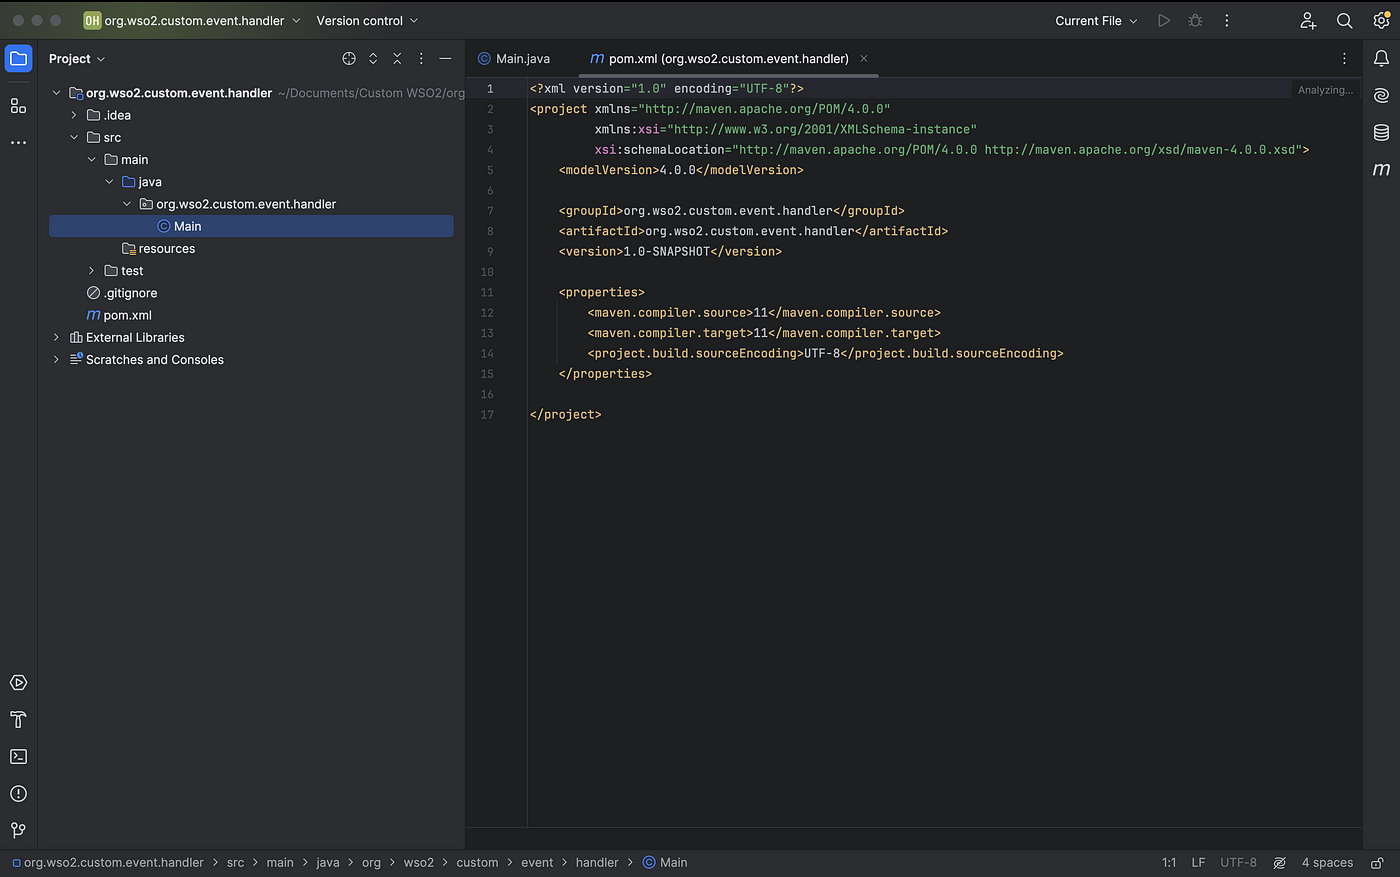
Project Structure
Next, update the pom.xml as follows to include the necessary dependencies.
<?xml version="1.0" encoding="UTF-8"?>
<project xmlns="http://maven.apache.org/POM/4.0.0"
         xmlns:xsi="http://www.w3.org/2001/XMLSchema-instance"
         xsi:schemaLocation="http://maven.apache.org/POM/4.0.0 http://maven.apache.org/xsd/maven-4.0.0.xsd">
    <modelVersion>4.0.0</modelVersion>

    <groupId>org.wso2.custom.event.handler</groupId>
    <artifactId>org.wso2.custom.event.handler</artifactId>
    <version>1.0-SNAPSHOT</version>
    <packaging>bundle</packaging>
    <name>org.wso2.custom.event.handler</name>

    <properties>
        <maven.compiler.source>1.8</maven.compiler.source>
        <maven.compiler.target>1.8</maven.compiler.target>
        <project.build.sourceEncoding>UTF-8</project.build.sourceEncoding>
        <!-- Maven Artifact Versions -->
        <maven.compiler.plugin.version>2.0</maven.compiler.plugin.version>
        <maven.bundle.plugin.version>3.2.0</maven.bundle.plugin.version>
        <!-- Apache Versions -->
        <apache.felix.scr.ds.annotations.version>1.2.4</apache.felix.scr.ds.annotations.version>
        <commons.logging.version>1.2</commons.logging.version>
        <!-- OSGi -->
        <equinox.osgi.services.version>3.5.100.v20160504-1419</equinox.osgi.services.version>
        <osgi.framework.imp.pkg.version.range>[1.7.0, 2.0.0)</osgi.framework.imp.pkg.version.range>
        <osgi.service.component.imp.pkg.version.range>[1.2.0, 2.0.0)</osgi.service.component.imp.pkg.version.range>
        <commons-logging.osgi.version.range>[1.2,2.0)</commons-logging.osgi.version.range>
        <!--Carbon Identity Framework Version-->
        <carbon.identity.framework.version>5.25.92</carbon.identity.framework.version>
        <carbon.identity.framework.imp.pkg.version.range>[5.20.211, 6.0.0)
        </carbon.identity.framework.imp.pkg.version.range>
    </properties>

    <build>
        <plugins>
            <plugin>
                <groupId>org.apache.maven.plugins</groupId>
                <artifactId>maven-compiler-plugin</artifactId>
                <version>${maven.compiler.plugin.version}</version>
                <configuration>
                    <encoding>${project.build.sourceEncoding}</encoding>
                    <source>${maven.compiler.source}</source>
                    <target>${maven.compiler.target}</target>
                </configuration>
            </plugin>
            <!--<plugin>
                <groupId>org.apache.felix</groupId>
                <artifactId>maven-scr-plugin</artifactId>
                <version>1.7.2</version>
                <executions>
                    <execution>
                        <id>generate-scr-scrdescriptor</id>
                        <goals>
                            <goal>scr</goal>
                        </goals>
                    </execution>
                </executions>
            </plugin>-->
            <plugin>
                <groupId>org.apache.felix</groupId>
                <artifactId>maven-bundle-plugin</artifactId>
                <version>${maven.bundle.plugin.version}</version>
                <extensions>true</extensions>
                <configuration>
                    <instructions>
                        <Bundle-SymbolicName>${project.artifactId}</Bundle-SymbolicName>
                        <Bundle-Name>${project.artifactId}</Bundle-Name>
                        <Bundle-Description>Custom Event Handler Bundle</Bundle-Description>
                        <Private-Package>
                            org.wso2.custom.event.handler.internal
                        </Private-Package>
                        <Export-Package>
                            !org.wso2.custom.event.handler.internal,
                            org.wso2.custom.event.handler.*,
                        </Export-Package>
                        <Import-Package>
                            org.osgi.framework; version="${osgi.framework.imp.pkg.version.range}",
                            org.osgi.service.component; version="${osgi.service.component.imp.pkg.version.range}",
                            org.apache.commons.logging; version="${commons-logging.osgi.version.range}",
                            org.wso2.carbon.identity.event.*; version="${carbon.identity.framework.imp.pkg.version.range}"
                        </Import-Package>
                    </instructions>
                </configuration>
            </plugin>
        </plugins>
    </build>

    <dependencies>
        <dependency>
            <groupId>org.wso2.carbon.identity.framework</groupId>
            <artifactId>org.wso2.carbon.identity.event</artifactId>
            <version>${carbon.identity.framework.version}</version>
        </dependency>
        <dependency>
            <groupId>org.apache.felix</groupId>
            <artifactId>org.apache.felix.scr.ds-annotations</artifactId>
            <version>${apache.felix.scr.ds.annotations.version}</version>
        </dependency>
        <dependency>
            <groupId>org.wso2.eclipse.osgi</groupId>
            <artifactId>org.eclipse.osgi.services</artifactId>
            <version>${equinox.osgi.services.version}</version>
        </dependency>
        <dependency>
            <groupId>commons-logging</groupId>
            <artifactId>commons-logging</artifactId>
            <version>${commons.logging.version}</version>
        </dependency>
    </dependencies>

    <repositories>
        <repository>
            <id>wso2-nexus</id>
            <name>WSO2 internal Repository</name>
            <url>https://maven.wso2.org/nexus/content/groups/wso2-public/</url>
            <releases>
                <enabled>true</enabled>
                <updatePolicy>daily</updatePolicy>
                <checksumPolicy>ignore</checksumPolicy>
            </releases>
        </repository>
        <repository>
            <id>wso2.releases</id>
            <name>WSO2 internal Repository</name>
            <url>https://maven.wso2.org/nexus/content/repositories/releases/</url>
            <releases>
                <enabled>true</enabled>
                <updatePolicy>daily</updatePolicy>
                <checksumPolicy>ignore</checksumPolicy>
            </releases>
        </repository>
        <repository>
            <id>wso2.snapshots</id>
            <name>WSO2 Snapshot Repository</name>
            <url>https://maven.wso2.org/nexus/content/repositories/snapshots/</url>
            <snapshots>
                <enabled>true</enabled>
                <updatePolicy>daily</updatePolicy>
            </snapshots>
            <releases>
                <enabled>false</enabled>
            </releases>
        </repository>
    </repositories>
</project>
As you can see, we are using the WSO2 Identity Server’s Eventing Framework. Also, you can see the following section in the pom.xml file.
<plugin>
 <groupId>org.apache.felix</groupId>
 <artifactId>maven-bundle-plugin</artifactId>
 <version>${maven.bundle.plugin.version}</version>
 <extensions>true</extensions>
 <configuration>
  <instructions>
   <Bundle-SymbolicName>${project.artifactId}</Bundle-SymbolicName>
   <Bundle-Name>${project.artifactId}</Bundle-Name>
   <Bundle-Description>Custom Event Handler Bundle</Bundle-Description>
   <Private-Package>
     org.wso2.custom.event.handler.internal
   </Private-Package>
   <Export-Package>
     !org.wso2.custom.event.handler.internal,
     org.wso2.custom.event.handler.*,
   </Export-Package>
   <Import-Package>
     org.osgi.framework; version="${osgi.framework.imp.pkg.version.range}",
     org.osgi.service.component; version="${osgi.service.component.imp.pkg.version.range}",
     org.apache.commons.logging; version="${commons-logging.osgi.version.range}",
     org.wso2.carbon.identity.event.*; version="${carbon.identity.framework.imp.pkg.version.range}"
   </Import-Package>
  </instructions>
 </configuration>
</plugin>
You may wonder why we have an entry for a package named internal since we haven’t created it. Although haven't created the internal package yet, the above configurations are needed to bundle our custom component as an OSGi service. We will be looking at why we needed the above configuration at the end of the custom component implementation.
Step 2: Write the Custom Event Handler
To write a new event handler, we need to extend the org.wso2.carbon.identity.event.handler.AbstractEventHandler class. To do that, create a new class named CustomEventHandler and extend the AbstractEventHandler class. When you extend the AbstractEventHandler class, you will be prompted to implement the handleEvent() method as well.
package org.wso2.custom.event.handler;

import org.wso2.carbon.identity.event.IdentityEventException;
import org.wso2.carbon.identity.event.event.Event;
import org.wso2.carbon.identity.event.handler.AbstractEventHandler;

public class CustomEventHandler extends AbstractEventHandler {
    @Override
    public void handleEvent(Event event) throws IdentityEventException {

    }
}
Furthermore, we can override, the getName() method to set the name for the event handler and the getPriority() method to set the priority of the event handler. After implementing those two methods the CustomEventHandler class will look like this.
package org.wso2.custom.event.handler;

import org.wso2.carbon.identity.core.bean.context.MessageContext;
import org.wso2.carbon.identity.event.IdentityEventException;
import org.wso2.carbon.identity.event.event.Event;
import org.wso2.carbon.identity.event.handler.AbstractEventHandler;

public class CustomEventHandler extends AbstractEventHandler {
    @Override
    public void handleEvent(Event event) throws IdentityEventException {

    }

    @Override
    public int getPriority(MessageContext messageContext){
        return 50;
    }

    @Override
    public String getName(){
        return "custom.event.handler";
    }
}
Since we need to log the event information, we can implement that logic inside the handleEvent() method.
package org.wso2.custom.event.handler;

import org.apache.commons.logging.Log;
import org.apache.commons.logging.LogFactory;
import org.wso2.carbon.identity.core.bean.context.MessageContext;
import org.wso2.carbon.identity.event.IdentityEventConstants;
import org.wso2.carbon.identity.event.IdentityEventException;
import org.wso2.carbon.identity.event.event.Event;
import org.wso2.carbon.identity.event.handler.AbstractEventHandler;

public class CustomEventHandler extends AbstractEventHandler {

    private static final Log log = LogFactory.getLog(CustomEventHandler.class);

    @Override
    public void handleEvent(Event event) throws IdentityEventException {
        if (IdentityEventConstants.Event.PRE_ADD_USER.equals(event.getEventName())) {
            String tenantDomain = (String) event.getEventProperties().get(IdentityEventConstants.EventProperty.TENANT_DOMAIN);
            String username = (String) event.getEventProperties().get(IdentityEventConstants.EventProperty.USER_NAME);
            log.info("Handling the event before adding user: " + username + " in tenant domain" + tenantDomain);
            // You can write any code here to handle the event
        }

        if (IdentityEventConstants.Event.POST_ADD_USER.equals(event.getEventName())) {
            String tenantDomain = (String) event.getEventProperties().get(IdentityEventConstants.EventProperty.TENANT_DOMAIN);
            String username = (String) event.getEventProperties().get(IdentityEventConstants.EventProperty.USER_NAME);
            log.info("Handling the event after adding user: " + username + " in tenant domain" + tenantDomain);
            // You can write any code here to handle the event
        }
    }

    @Override
    public int getPriority(MessageContext messageContext) {
        return 50;
    }

    @Override
    public String getName() {
        return "custom.event.handler";
    }
}
After creating the event handler, to use this custom event handler with WSO2 Identity Server, we need to register it as an OSGi component.
Step 3: Register the Event Handler
To register our newly created event handler, we need to create a new package named internal. This is the package we have seen in our pom.xml file. Since we need that package and the classes inside of that package to register our service as an OSGi service, we need to mark that as a private package and exclude it from our export packages list in the pom.xml file. That’s the reason behind the configuration we have seen in the pom.xml file.
After creating the new package, create a new class inside of that named, CustomEventHandlerComponent. Make sure to add the following code inside that class to register it as an OSGi service. I am not going to explain why we needed the following configurations to make it an OSGi service, but you can find out how to create OSGi services and their configurations from my previous article.
package org.wso2.custom.event.handler.internal;

import org.apache.commons.logging.Log;
import org.apache.commons.logging.LogFactory;
import org.osgi.service.component.ComponentContext;
import org.osgi.service.component.annotations.Activate;
import org.osgi.service.component.annotations.Component;
import org.osgi.service.component.annotations.Deactivate;
import org.wso2.carbon.identity.event.handler.AbstractEventHandler;
import org.wso2.custom.event.handler.CustomEventHandler;

@Component(name = "org.wso2.custom.event.handler",
        immediate = true)
public class CustomEventHandlerComponent {

    private static final Log log = LogFactory.getLog(CustomEventHandlerComponent.class);

    @Activate
    protected void activate(ComponentContext ctx){

        CustomEventHandler eventHandler = new CustomEventHandler();
        ctx.getBundleContext().registerService(AbstractEventHandler.class.getName(), eventHandler, null);
        log.info("Custom event handler activated successfully.");
    }

    @Deactivate
    protected void deactivate(ComponentContext ctx){
        if(log.isDebugEnabled()){
            log.debug("Custom event handler is deactivated");
        }
    }
}
After creating the register component, you need to properly configure the packages that are needed to import and export. With the following configuration, you have already done that.
<plugin>
 <groupId>org.apache.felix</groupId>
 <artifactId>maven-bundle-plugin</artifactId>
 <version>${maven.bundle.plugin.version}</version>
 <extensions>true</extensions>
 <configuration>
  <instructions>
   <Bundle-SymbolicName>${project.artifactId}</Bundle-SymbolicName>
   <Bundle-Name>${project.artifactId}</Bundle-Name>
   <Bundle-Description>Custom Event Handler Bundle</Bundle-Description>
   <Private-Package>
     org.wso2.custom.event.handler.internal
   </Private-Package>
   <Export-Package>
     !org.wso2.custom.event.handler.internal,
     org.wso2.custom.event.handler.*,
   </Export-Package>
   <Import-Package>
     org.osgi.framework; version="${osgi.framework.imp.pkg.version.range}",
     org.osgi.service.component; version="${osgi.service.component.imp.pkg.version.range}",
     org.apache.commons.logging; version="${commons-logging.osgi.version.range}",
     org.wso2.carbon.identity.event.*; version="${carbon.identity.framework.imp.pkg.version.range}"
   </Import-Package>
  </instructions>
 </configuration>
</plugin>
But in case you are not sure about the packages that are needed to import, you can use <DynamicImport-Package>\</DynamicImport-Package> instead of using <Import-Package>…</Import-Package>.*
Step 4: Test the Custom Event Handler
To test the custom event handler, we need to build it first. Open the console and type the following command to get the custom component as a .jar file.
mvn clean install -DskipTests
After that, you can see the .jar file in the target directory of the custom component.
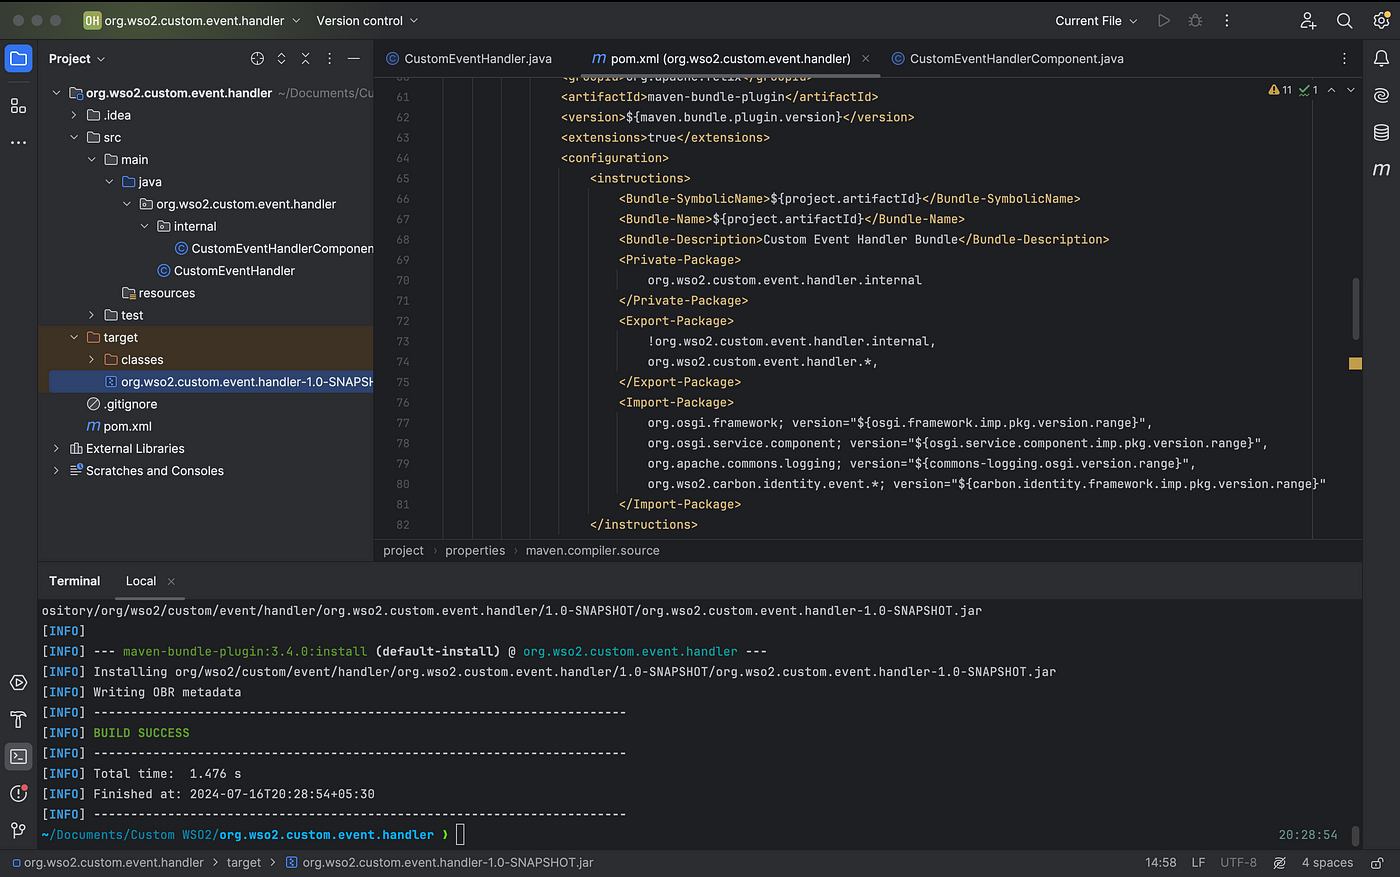
Download a fresh WSO2 Identity Server 6.1 pack from here and go to <IS_HOME>/repository/components/dropinsdirectory and paste the .jar file there.
Next, open the <IS_HOME>/repository/conf and open deployment.toml file and add the following configuration there.
[[event_handler]]
name="custom.event.handler"
subscriptions=["PRE_ADD_USER","POST_ADD_USER"]
Make sure to provide the name you have declared in the getName() method for this. Next, start the WSO2 Identity Server with the following command.
Linux/Mac Users →
./wso2server.sh -DosgiConsoleWindows →
wso2server.bat -DosgiConsole
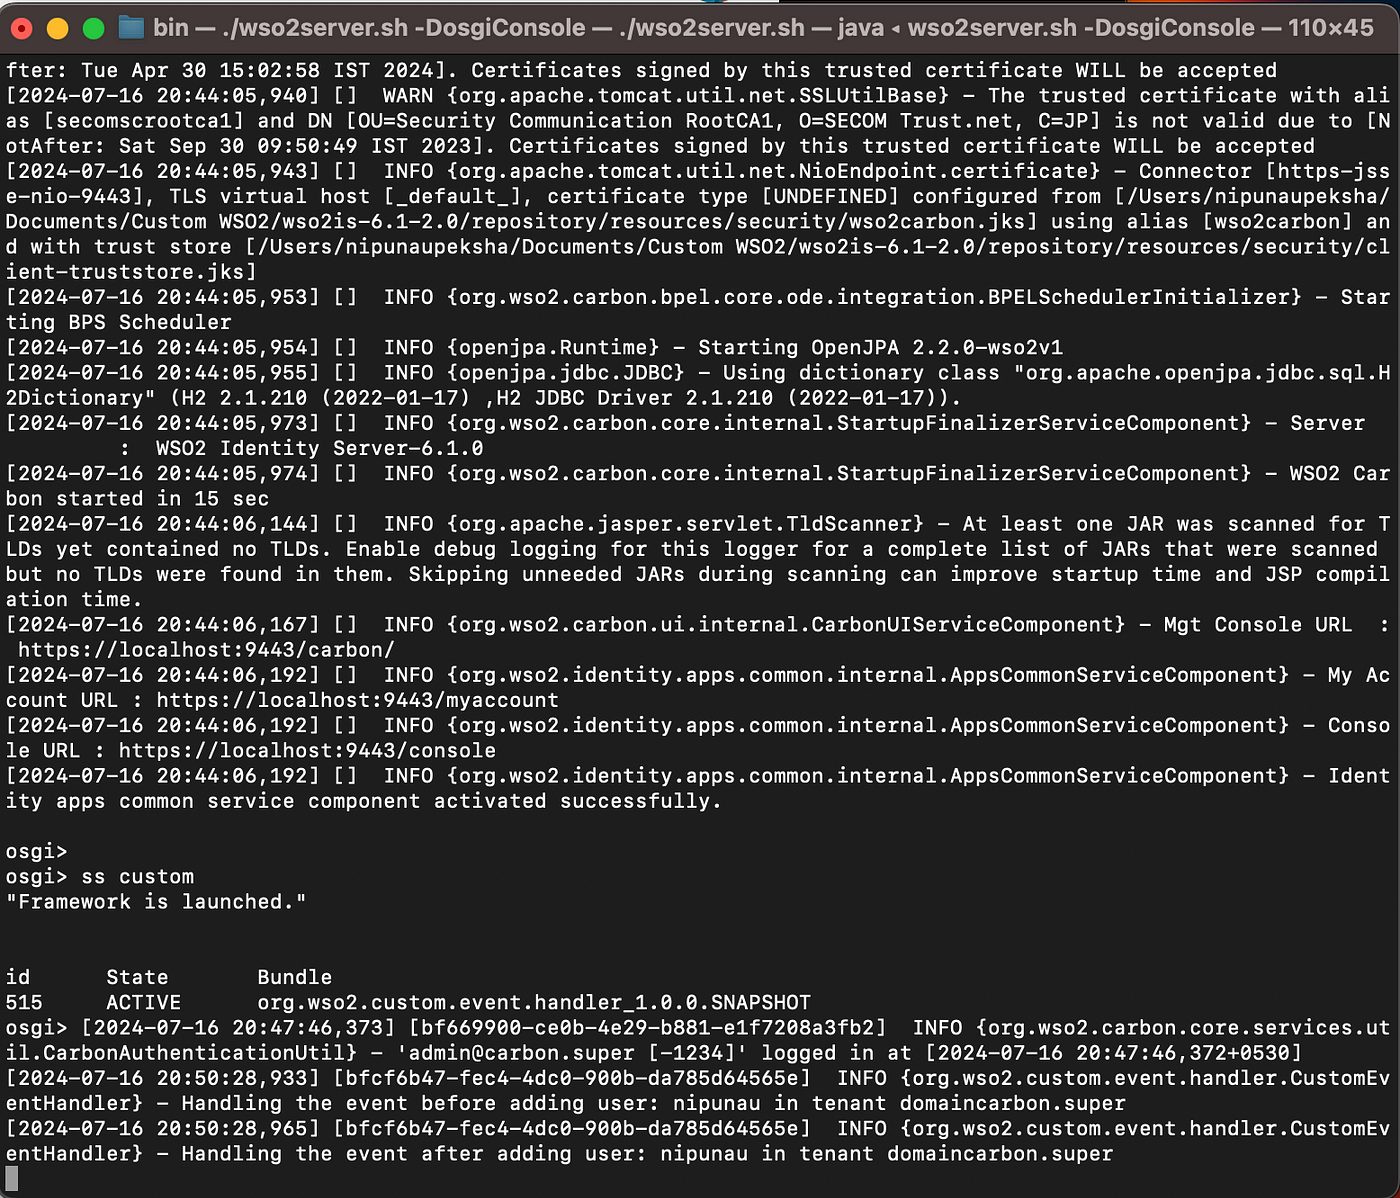
With -DosgiConsole flag, you are activating the inbuilt OSGi console of the WSO2 Identity Server. With ss <component_name>command you can check whether your custom component is in an ACTIVE state or not. You can check the other important OSGi Console commands from this article.
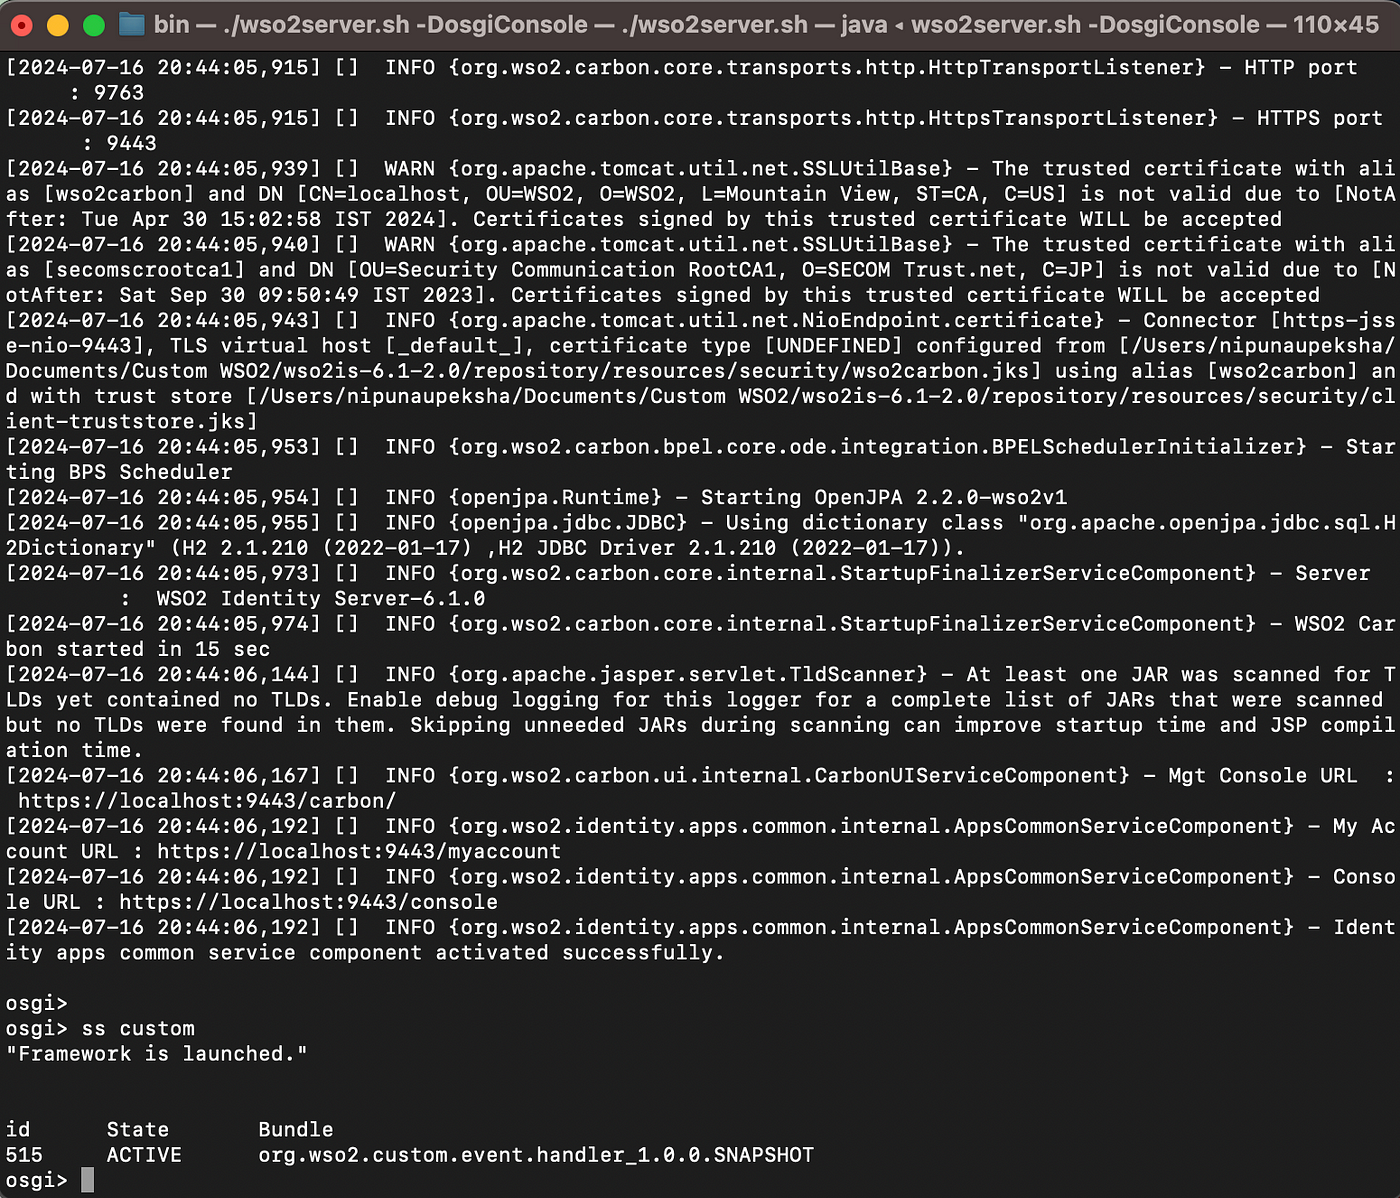
If the component is in the ACTIVE state, you can check the event handler by going to the WSO2 Management Console and creating a new user.
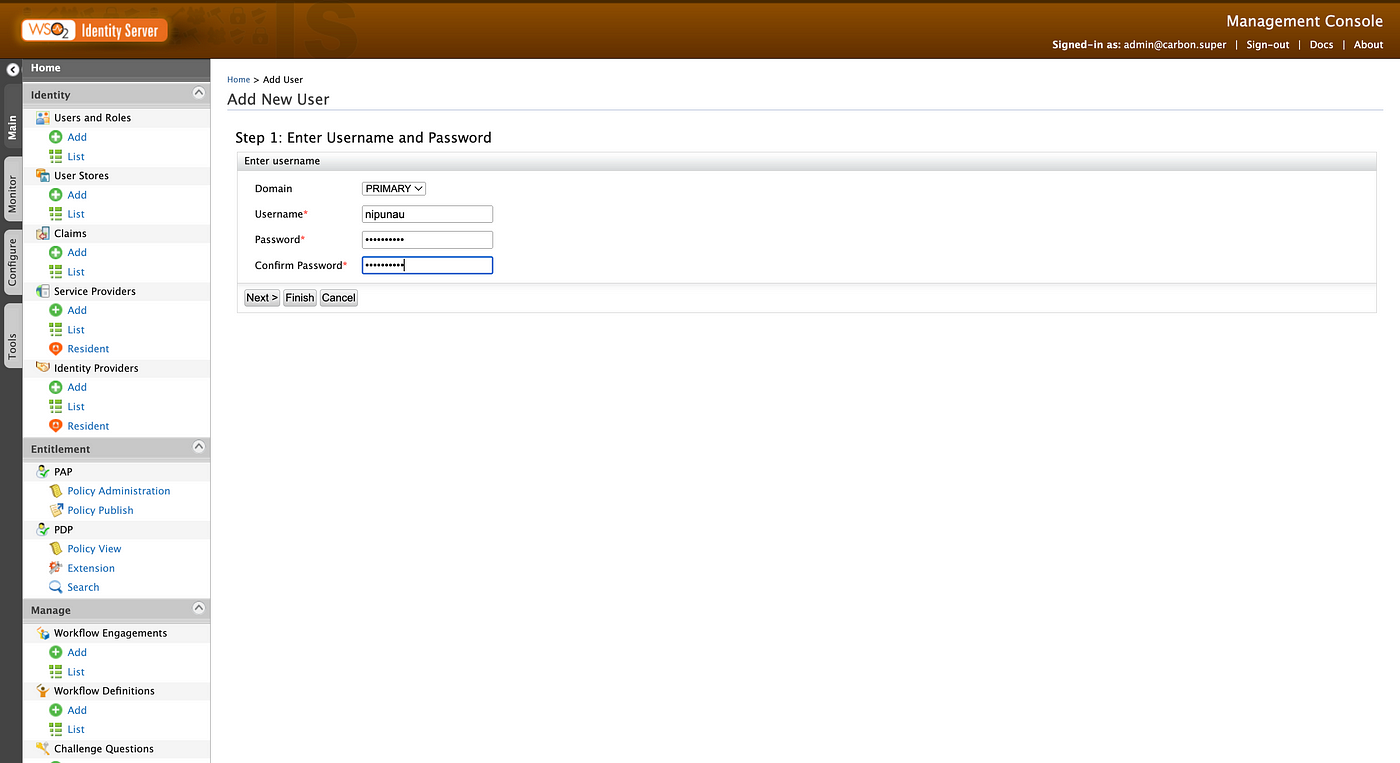
First, type https://localhost:9443/carbon and go to the WSO2 Management Console. Use admin for username and password to log in. Then click on Users and Roles → Add → Add New User to create a new user.
Provide a username and password for the user and click on the Finish button.
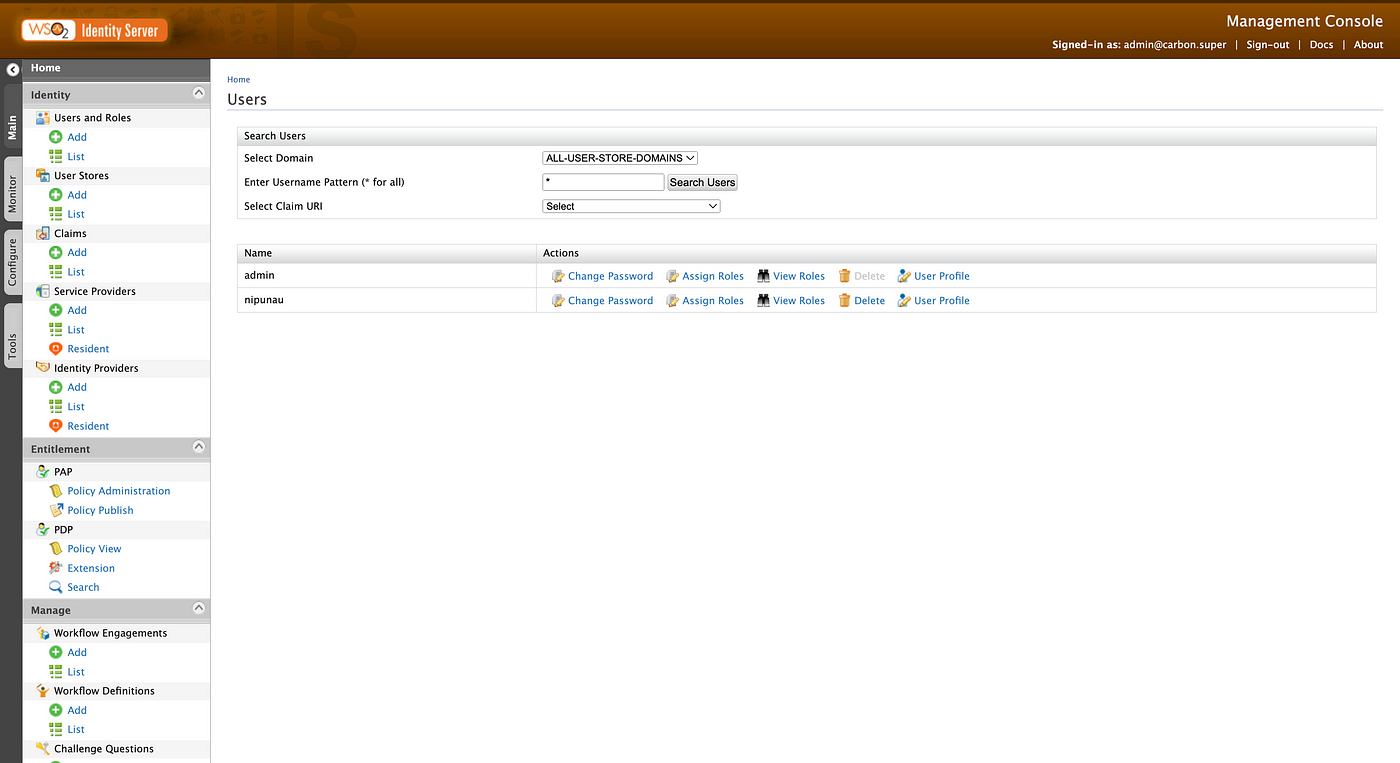
You can see the newly created user in the PRIMARY userstore.
And if you go to the terminal application now, you can see the user’s details are printed as we programmed in the custom event handler.
So this is it! This is how you can write a custom event handler for WSO2 Identity Server. You can find more information on WSO2 Event Handlers from the official WSO2 documentation.
You can find the implemented Custom Event Handler from the below link.

